Ahamed Safnaj

I am a

Ahamed Safnaj

Hi , I am Safnaj.The main purpose is to build something that you need and that you will love. I lead powerful projects through innovative and modern technologies.My work says a lot about me, passionate about all I do.
Welcome to My Blog !!!

  • +94 777974207
  • safnaj99@live.com
  • www.ahamedsafnaj.com
  • Sri Lanka


  • Download CV

Me

My Professional Skills

Fullstack Development 80%
UI/UX Designing 60%
App Development 70%
AWS/Azure 80%
Software Engineering 70%

Programming

Java
PHP/Laravel
Node.js
Angular
JavaScript

Cloud Platforms

Microsft Azure
Amazon Web Services
Google Cloud Platofrm
Heroku
Digital Ocean

Tools and Technoogies

Git and GitHub
Docker
GitHub Actions
Flutter
Wordpress

Work Experience

Trainee Software Engineer at Virtusa
Web Developer at Maruthamunai Online

Volunteer Experience

Member at FOSS Communtity, SLIIT
Member at Kalmunai IT Hub
Google Crowdsource Community Sri Lanka
Developer Circles From Facebook, Colombo

0
Completed Projects
0
Coffees
0
facebook likes
0
current projects
  • How to SSH into AWS Elastic Beanstalk


    Hello reader..! few days ago i had to deploy a docker container to AWS Elastic Beanstalk. It's really easy to deploy containers using AWS Elastic Container Service. But if you want to pull a docker image from DockerHub we have to do some additional configurations. So i thought to SSH into the EC2 instance and play-around there. Let's see how i did it. 


    What is AWS Elastic Beanstalk ?


    I hope all of you know what Cloud Computing is. A number of cloud vendors including Amazon Web Services (AWS), Microsoft Azure & Google Cloud Platform offers development tool to help make the process on deploying applications more simple and secure on a PaaS (Platform as a Service) model.


    AWS Elastic Beanstalk is an easy-to-use service for deploying and scaling web applications and services developed with Java, PHP, .Net, Node.js, Python, Ruby, Go and Docker. A developer can easily deploy an application without provisioning the underlying infrastructure while maintaining high availability with load balancing, auto-scaling. You only pay for the AWS resources need to run your applications. Beanstalk allows developers to just focus more on developing code for their application rather than spending time on managing and configuring servers, databases, firewalls and networks.

    Also, it has a CLI tool called EB CLI which you can use to deploy your application right from your terminals. 

    To Learn More : https://aws.amazon.com/elasticbeanstalk/


    What is SSH ?


    SSH stands for Secure Shell or Secure Socket Shell. It's a cryptographic network protocol that allows two computers to communicate and share the data over a network. It's used to login a remote server to execute commands and data transfer from one machine to another machine.

    Step 1 - Creating an Application in EBS


    As the first step we need to go to AWS console and navigate to Elastic BeanStalk. Then create a new application. I chose Docker as my platform.
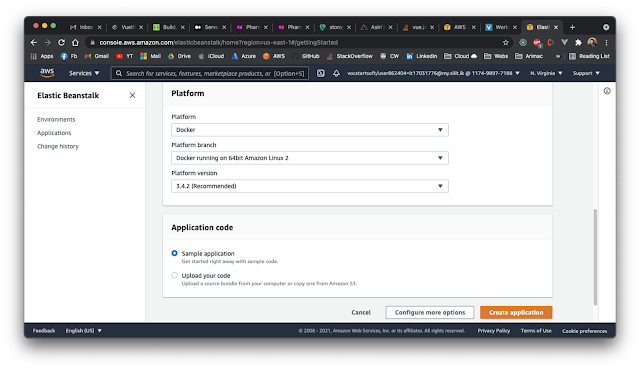
    Create New Beanstalk Application

    Once you create you application, Beanstalk will automatically create Auto Scaling, Security Group, Cloud Watch & EC2 instances for you as you can see in the below image. This process may take up to 5 minutes.
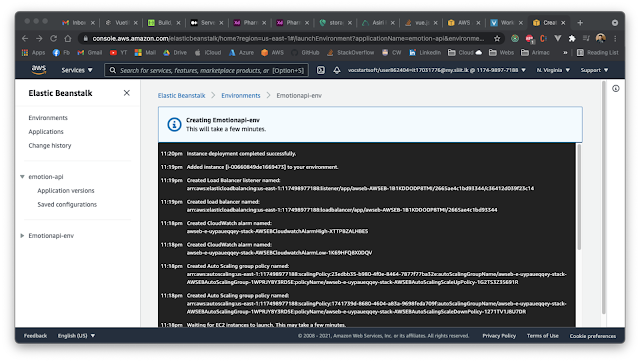
    Create New Beanstalk Application

    Once the application created successfully you may see the health status as Ok, if the application running successfully.
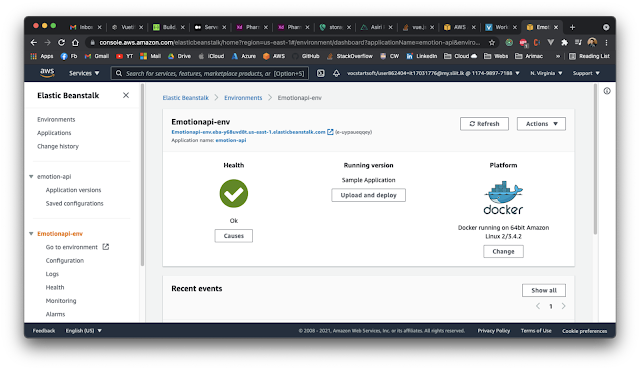
    Status of New Beanstalk Application

    Step 2 - Creating new Key Pair


    Once we created a New Beanstalk Application an EC2 instance will be created automatically. So we have to create New Key Pair for the EC2 Instance and attached it to the Beanstalk Application.

    EC2 Instance of the Beanstalk Application

    Go to Instances -> Key Pairs -> Create Key Pair
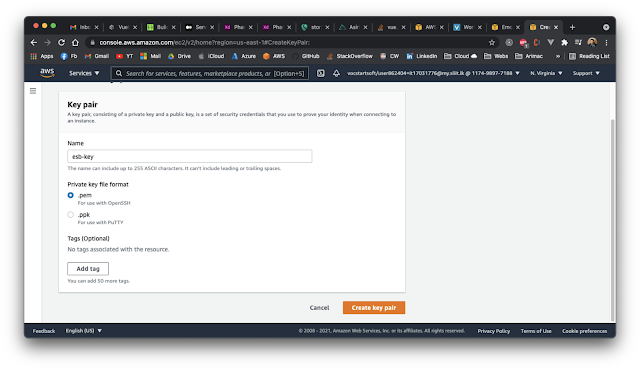
    Create New Key Pair

    Once you create a new key pair. Download the key.pem file and store somewhere in your PC.

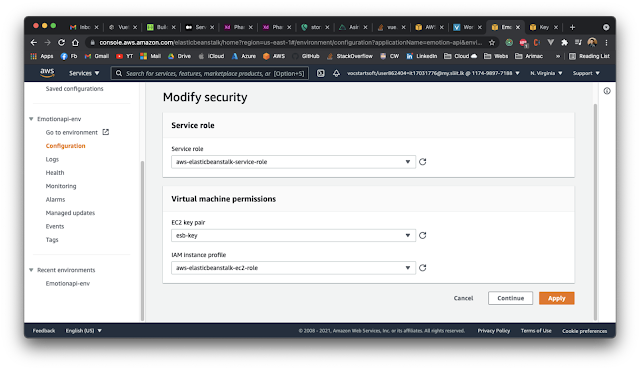
    Step 3 - Change the Security Settings of Beanstalk App


    Once we created a new Key Pair, we have to attach that key pair to our Beanstalk Application. 

    Go to Beanstalk App -> Configuration -> Security
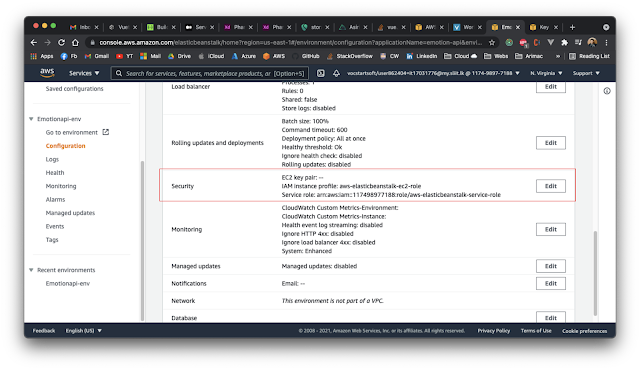
    Beanstalk App Configuration

    Change Beanstalk EC2 Key Pair


    Step 4 - Enable SSH from Security Group Rules


    If the SSH protocol not configured in the security rules, we may not allowed to SSH into the EC2 Instance. 

    Go to EC2 Instance -> Security Group -> Add Inbound Rule

    Check whether SSH has already enabled. If not add a new inbound rule shown below.

    SSH | tcp | 22 | 22 | 192.168.1.1/32
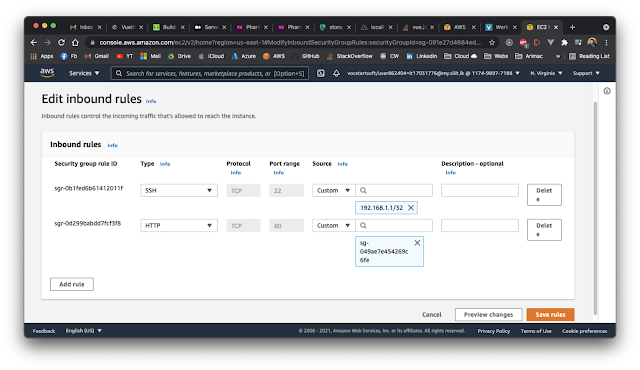
    Inbound Rules of the EC2 Instance

    Step 5 - Let's SSH into the Beanstalk EC2 Instance


    As the first step here, we need to change the .pem file permission. So run the below command in your terminal. Make sure your file path is correct. 

    chmod 600 filename.pem 

    Once you changed the file permission you can SSH to the BeanStalk instance. Follow the below code. You have to replace the ip address or you can use public DNS as well.

    ssh -i keyfile.pem ec2-user@3.86.121.132
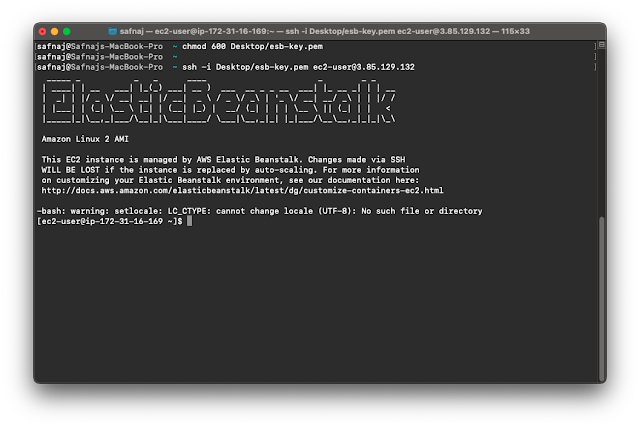
    SSH into Beanstalk


    Done..! We are successfully into the BeanStalk Instance. 

    Step 6 - Deploying a Docker Image from DockerHub (Optional)


    It's completely an optional step. Since i chose Docker as the application platform i am going to deploy a container. You can deploy your web applications too. 

    For my final year research project, i have developed a web service which can recognise human emotions from the human facial images. So I've containerized the application and kept on DockerHub. Before running a new container, we have to stop or remove existing containers running on our application. There will be a default container running for all new BeanStalk Container Applications. You can use below command to check the status of the running containers.

    "docker container lsor "docker ps"

    To remove running containers use "docker container rm -f container_id"

    Now its time to pull my docker image from Docker Hub (https://hub.docker.com/r/safnaj/emotion-api). Run below command to pull a docker image.

    "docker pull safnaj/emotion-api:myapp"
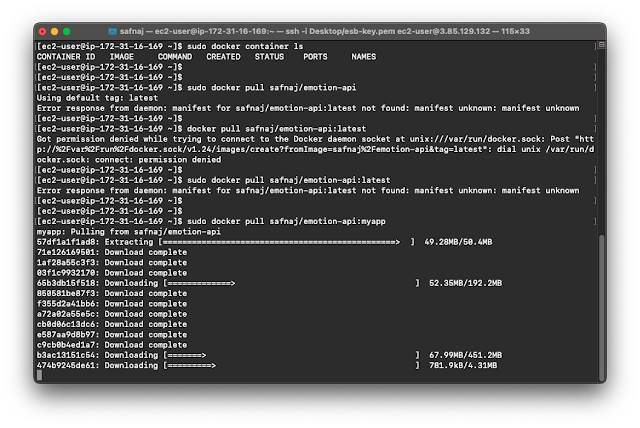
    Pull Docker Image


    Once we pulled the image successfully, lets check the image using "docker image ls" command.

    Now we can run our container. Since i have deleted the existing container the port 8000 is free now. So let's deploy the container on port 8000 using below command.

    "docker run -d -p 8000:8000 safnnaj/emotion-api:myapp"
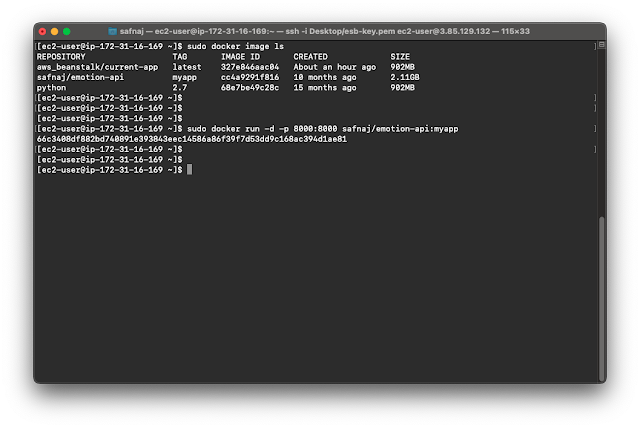
    Run Docker Container


    Let's access the application via the Public DNS and check.
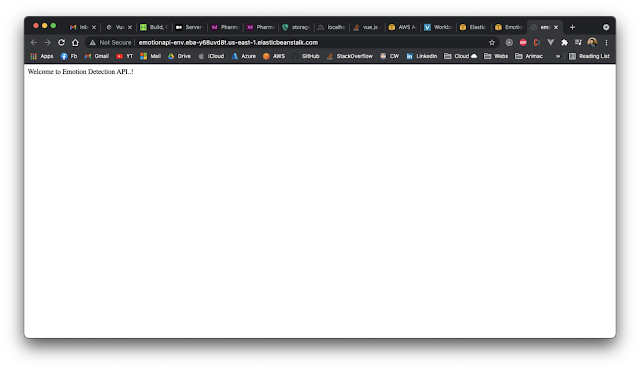
    Application Deployed


    Hooreyyy..!!! We have successfully deployed our container to BeanStalk by SSH into the BeanStalk Instance. 

    It's not a good option to SSH into the instances of the managed services. But if you want to reduce some extra steps and playaround with your instance, this method would be helpful. Always keep in mind to use this method for Dev or Testing Purpose.


  • Deploying a MERN Stack to Heroku using GitHub Actions


    Hello good people, I recently worked on a personal E-Commerce project. I choose MERN stack as it would have been a good learning experience. In this article, I will describe how to deploy a MERN Stack Application to Heroku using GitHub Actions.


    MERN Stack

    MERN Stands for MongoDB, Express JS, React JS & Node.js, These technologies are used together to build web applications. Here Node.js and Express bind together to server the backend, MongoDB provides a NoSQL database to store the data and frontend is built using React whee user interact with. All these four technologies are open-source, cross-platform and JavaScript based. 

    As JavaScript is used throughout to build a Fullstack application, developers do not need to learn and change the context of using different programming languages to work on different aspects of a web application.


    What is GitHub Actions ?

    In my previous article on Deploying an Angular Application to Firebase using GitHub Actions i have explained about GitHub Actions in detailed. As a summary GitHub Actions makes it easy to automate all your software workflows now with world-class CI/CD. You can build, test and deploy your code right from your GitHub repository.

    To learn more about GitHub Actions : https://github.com/features/actions


    Wait, Are you a Student ??

    In this project i have used MongoDB Atlas & Heroku Cloud. Both are not actually Free. (Yes, they have free tier too). There is way to get these stuffs for free. GitHub Education offers a Student Developer Pack where you will get hundreds of tools and platform access for free while you are a student.  

    GitHub Student Developer Pack helps you as a student to ship software like a pro. Ensure that you learn by doing, use these tools to improve your skills. Be creative, these tools would allow you to build and develop brilliant innovations and make the world better. Believe me, this pack helped me lots for my academic projects including my final year research. You just need to be enrolled in a University and having a University email. 

    To learn more about the pack : https://education.github.com/pack


    Let's Deploy.....


    I have two folders, one for backend and another one for frontend (as usual). I have decided not to deploy frontend & backend separately. Instead i am going to server the built react project as static files using Express.js.

    We can serve the built react project without moving the build folder to the backend directory. But i am going to deploy only the backend folder to Heroku. So i just moved the build folder inside the backend directory. Or else you can set the custom path to build your react project too. 


    Next step is to match the route to serve the static files such as html, css, js and images. express.static built-in middleware function in express can be used to achieve this.

    Now, whenever the server hits with the / route it will serve the built react application in node server. 

    app.js
    const path = require("path");app.get("/", (req, res) => {
    res.sendFile(path.join(__dirname, "build"));
    });

    Now it's time to create the application in Heroku. Go to your Heroku Dashboard and create a new application.

    Next go to your Heroku Account settings and get your secret API Key. 


    Heroku Account API Key

    As a best practice we should not commit our .env config file to git. (It should be in our .gitignore). Heroku allows us to define the env vars on Heroku. We can do this using Heroku CLI or Heroku Dashboard. I am a kind of person who don't like to install all the CLIs on our PC. So i am going with Heroku dashboard to setup my config vars. Go to your project settings and configure your env vars as shows in the below image. 


    Configure Environment Variables in Heroku

    We all done with Heroku works and configured node server to serve the static site contents. Let's move to GitHub to setup our CI/CD Pipeline. As the first step, go to your GitHub Repository Settings and create a new secret and store your Heroku API Key. (You can refer my previous article for the screenshots)

    Now go to the actions tab in your GitHub Repository and click set up a workflow yourself.

    Create new GitHub Action

    Now modify your YAML file (.yml) as shown below. 


    We skipped creating the heroku config file called Procfile and configured that one in our GitHub Actions as in the last line. 

    Also you can setup custom branch deployment, deploy as containers, heroku health checks using the actions. To learn more about deploy-to-heroku action visit this link.


    Alright, let's commit the file to the project now. Now as per my workflow code, every time you push to the main branch in the repository, the commands will fire off automatically and will deploy the application to the Heroku Cloud. Now go ahead and make some changes in your project, then push it to GitHub and watch the workflow performs in the Actions tab.


    GitHub Actions Triggers

    Cheers..! 


  • Deploying an Angular Application to Firebase using GitHub Actions


    CI/CD or Continuous Integration/ Continuous Deployment  is one of the developer keyword these days. In this article we will be automating the deployment of an Angular applications using GitHub Actions. Meanwhile that every time we hit git push origin master  GitHub will automatically kick the build process and then deployed to the cloud platform.

    Prerequisites :

    • Angular Project
    • GitHub Account
    • Firebase Tools
    • Firebase Account
    • IDE (VS Code)
    • Node Installed

    What is Firebase Hosting ?


    Firebase Hosting is a production-grade web content hosting for developers. Firebase gives you fast, secure and reliable way to host your app's static assets (HTML, CSS, Javascript & Media Files). The production-grade hosting is backed by a global content delivery network (CDN). Firebase Hosting serves your content over SSL, by default. Also you can use your own custom domain or your project's fee subdomain with firebaseapp.com

    To learn more about Firebase Hosting : https://firebase.google.com/docs/hosting

    What is GitHub Actions ?


    GitHub was introduced a new feature called GitHub Actions back in 2018. GitHub Actions make it easy to automate all your software workflows. GitHub Actions let you build, test and deploy your code right from your GitHub repository. GitHub takes care of a number of process that can be triggered by a variety of events on the platform such as Pushing Code, Making a release & Pull requests.

    Every GitHub Action required a .yml file. The file us used to describe actions, behaviour and other stuffs.
    .yml stands for YAML, which is a human-readable data serialisation language. It's commonly used for configuration files and in applications where data is being stored.

    To learn more about GitHub Actions : https://github.com/features/actions


    Setting up Firebase Hosting Configurations


    For this demo, I am going to use an Angular Application which developed to learn Angular. You can use your own Application too. 

    • Install Firebase tools via NPM : npm install -g firebase-tools
    • Login to your firebase account: firebase-login
    • Navigate to your project directory and setup firebase configs : firebase init
    • Deploy the application to Firebase : firebase deploy

    Now you might see a file called firebase.json generated into your project directory. The file simple specifies which files and settings from your project directory are deployed to your Firebase project. 

    Modify the firebase.json file as shown in the below image. Refer the angular.json file to get your project output folder. In my case it is "outputPath": "dist/Online-Store-Angular"

    firebase.json file

    Setup Firebase Token in your GitHub Repository


    Now we have done everything locally to get started with the CI/CD deployment from our GitHub Repo. GitHub need access to our firebase resource to deploy the Angular application to the Firebase hosting.
    • Generate Access Token for Firebase CI : firebase login:ci
    It will ask you to authenticate to your firebase account. Once it authenticated it will produce a Token key. Now go to your GitHub Repository Settings and create new Secret key and paste your token key to the value field as shown in the below image.

    GitHub Repository Secret Key

    Setup GitHub Actions Workflow


    In your repository click Actions to create your first workflow. There you can see plenty of Workflow templates available. We are going to make our own workflow. Click on Set up a workflow yourself.

    Setup New GitHub Workflow

    GitHub gives us a chance to glance over it. Everything seems i order, and here i what is happening inside the file.
    • Spin up an Ubuntu Server
    • Install Node.js
    • Install Node dependencies for the project
    • Build the Application
    • Deployment

    Now modify your YAML file (.yml) as shown below. 

    Alright, let's commit the file to the project now. Now as per my workflow code, every time you push to the repository, the commands will fire off automatically and will deploy the application to the Firebase Hosting. 

    Now go ahead and make some changes in your project, then push it to GitHub and watch the workflow performs in the Actions tab.

    GitHub Action Triggers


    Cheers..! That's it folks. Explore more about GitHub Actions and automate your deployment process.


  • Building a simple Web API using Node.js


    Have you been working with JavaScript Front-end technologies and eager to learn JavaScript for Full Stack Development ??  If yes, you are in the right place. JavaScript become an an essential technology that every developers should know in this era. In this article, I'll show you step by step to create a simple RESTful Web API using Node.js & Express.js by building a Web Service.

    Prerequisites :

    • Basic Knowledge of JavaScript
    • Basic of ES5 & ES6 Concepts
    • Node Installed (https://nodejs.org/)
    • IDE (VS Code)
    • Postman Installed

    What is Node.js ?

    This is a question that raises to most of the developers when they new for the Node environment. 

    Node.js is Not a
    • Programming Language
    • Framework
    Node.js is a
    • JavaScript Runtime Environment
    • Built on Chrome's V8 Engine
    • Its Free & Open Source
    • Written in C++
    • Its runs on various platforms (Windows, Linux, MacOS)

    So Node is allows you to run the JavaScript codes for server communications. The V8 engine in your browser takes your JavaScript code and converts in into a faster machine code. So Machine code is low-level code which the computer can run without needing a interpreter. 

    Why Node.js

    • It's fast & efficient
    • Highly Scalable
    • Event drive, no-blocking I/O model
    • Asynchronous
    • Popular in the industry
    • Same language for both client & server-side

    What is Express.js ?

    Express.js is one the the most popular framework for back-end development. It's highly customizable using middleware. Also Express JS us very easy to use and learn. Express.js basically helps you to manage everything from routes to handling requests & views. 


    What is REST API ?

    REpresentation State Transfer (REST) is an architectural style or design for APIs. Also it is a set of rules that developers follow when they create their API. These rules states that you should be able to get a piece of data (resource) when you link to a specific service URL. 

    Each URL is called Request while the data sent back to you is called Response

    Setting Up the Project

    Once you installed Node.js on your PC go the the CMD and type following commands to make sure its installed successfully.
    node -v
    npm -v
    Create a new folder and go the directory from CMD or VS Code Terminal and initialize new Node.js Project.
    npm init

    Fill the requested information to your requirements. Once it done you will get a new file created called package.json as below.


    Now we can install the express.js web framework by running the below command.

    npm install --save express

    The --save flag is used to edit your package.json file and add express as a dependency. After the installation complete, open up our package.json to see express is listed under dependency. By doing this you could send just your code and package.json file to your friend without the node_modules. Your friend can install all the necessary modules by running the npm install command.

    Creating the Application

    Now its time to code your application. Create a file called App.js and add the following code.


    Congratulations..! You just made your first useless express server. So lets make it something useful. Now you can start the server by running node app.js command & your app will be accessible using http://localhost:3000. But it won't get you anything because We have coded to start our server but we haven't implemented the REST protocols yet to listen to any events.

    Making Request Handlers 

    A Server receives requests, process them and returns a response. So you need to use the routes to handle this requests. The main requests types are GET, POST, PUT & DELETE.

    Let's create a simple GET request that returns a list of users. Modify your app.js file shown as below.

    This simple function makes the express application to use the url handle "/users" to trigger the callback. This callback accepts two parameters, req is the request body which carries information about request & the res is the response body which is used to handle the response functions like .render() to render templates and .json() to return JSON data.

    Running the Application

    To run your application, use the below command.
    node App.js
    If you get "Server running on port 3000" in your Terminal, it means our app is now successfully running. Open your browser and enter http://localhost:3000/users. You will expect to see something like a array of names. /users is the route that we created to send some user's name in JSON format. 

    This is the awesomeness of REST. There is no state between the client and the server. There is no any web pages server to parsed the date. This gives you a complete freedom. All you need to do is write some logic on a specific URL that connects to a Database, use the logic to process the data. You can make your client application any any technologies. It could be a Java Android Application, Ardunio Project or Angular Project. You just need to iterate and display the data anywhere you want. 


    Testing the API

    Let's test our API using POST Man App to make sure that the URL gives the response.


    Where to go from here ?

    With this introduction explore more about Node.js and build some applications. You can build high scalable efficient applications using Node,js, Express & MongoDB. Try to build MEAN (MongoDB, Express, Angular, Node.js) or MERN (MongoDB, Express, React, Node.js) Applications.  

    Some of my Node.js Projects : 


    Share with your mates & Thank You..!


  • How to Deploy an Angular Application to GitHub Pages using Actions


    In this article i will explain How to deploy an Angular Application to GitHub Pages using GitHub Actions. GitHub Actions make it easy to automate all your software workflows, now with world-class CD/CD. Using GitHub Actions we can Build, test and deploy our code directly from GitHub.

    GitHub Pages  is a feature in GitHub that allows you to host a static website or web application for free. Most of the companies & organisations using GitHub Pages as their Documentation site.

    If you are developing an Angular Application for GitHub Pages you need to build the Application for the production ready. Whenever we made some changes to the application we have to repeat the build process every time. By using GitHub Actions we can make the CI/CD process automated.

    To learn more about GitHub Actions : https://github.com/features/actions


    STEP 01 : 

    Code your Angular Application.

    STEP 02 : 

    In order to set up workflow, it is necessary to set up a secret key for the workflow. Its protect your workflow trigger accessing by outsiders. There for you need to create a GitHub Token.

    1. First Login to https://github.com
    3. Now navigate to the Developer Settings
    4. Click on the Personal Access Tokens.
    5. Generate New Token.

    Now you have got access token. Store it somewhere..

    STEP 03 : 

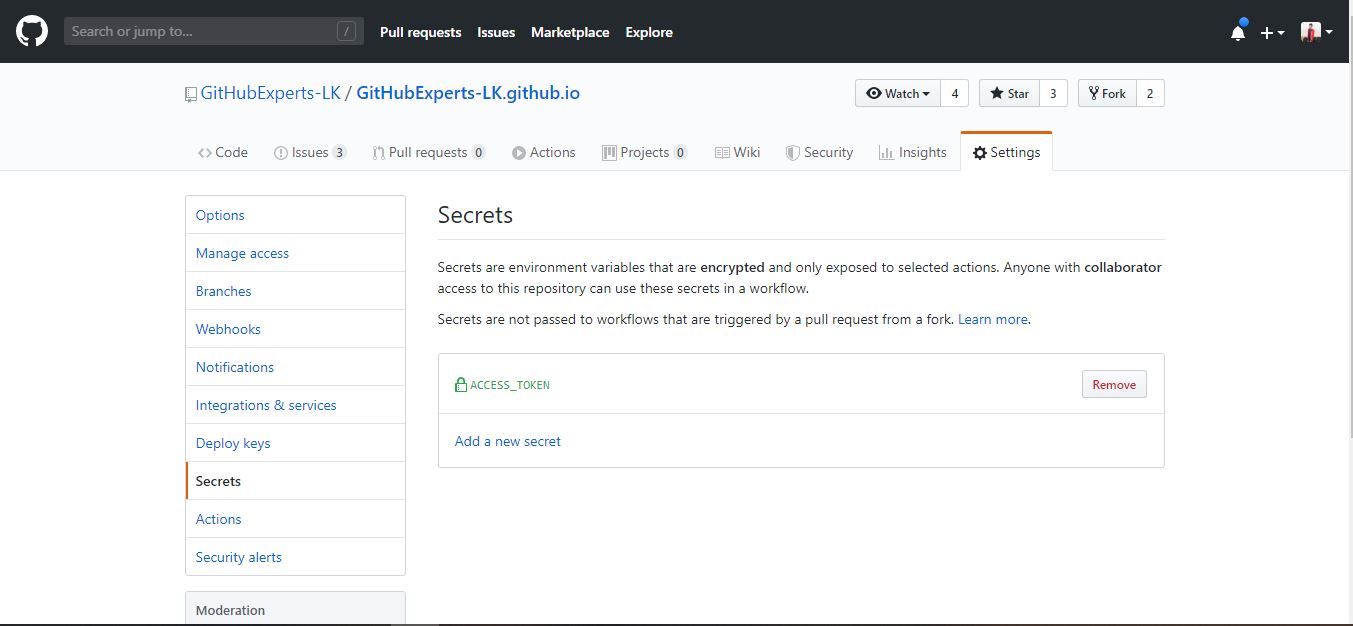
    Now its time to create the Secret Key in your Repository. 

    1. Go to your repository Settings.
    2. Click on Secrets
    3. Click on Add New Secret
    4. Put ACCESS_TOKEN as name and paste the GitHub Token that you got in the previous step. 
    5. Now Click Add Secret Button. 


    Now A Secret Key named ACCESS_TOKEN has been added to your repository.


    STEP 04 : 


    Now comes the main part. Go to your repository and navigate to Actions tab & Setup New Workflow. Now modify the workflow file as shown below.


    Angular provides a CLI tool called gh-pages to deploy the angular application to GitHub Pages. Here i prefer an CI/CD Automation to build and deploy Angular Application to GitHub Pages. Check it Here https://github.com/JamesIves/github-pages-deploy-action

    Here i selected development branch as Base Branch. Because for the Organisation GitHub pages we can not be able to choose which branch to deploy. By Default its on master branch. So here i do the developing process in the development branch. When i made any changes and pushed it will build the application to master branch and then deploys it to GitHub Pages. 

    BASE BRANCH - Branch which contains your Angular Application.
    BRANCH - Where is build and render the applications.
    FOLDER - App compiled directory.


    That's all. 

    Whenever you commit new changes to the development branch the build process will start automatically and deploys it to the GitHub pages. You can check the build process by navigating to the Actions tab. Changes will be live within a few seconds. You can check the below repo url where used Actions to build the Angular Application.


    I hope this article might useful for you.

    Keep Learning & Keep Building..!


  • Introduction to Git & Github


    Git and GitHub have become popular standards in the software development process. Here’s an introduction to how you can utilize both to write code and Git and GitHub have become popular standards in the software development process. Here’s an introduction to how you can utilize both to write code and build applications.build applications.


    What is Git?


    Git is a free and open source distributed version control system. What is version control? Essentially, it’s a system that allows you to record changes to files over time, thus, you can view specific versions of those files later on.

    Why Use Git?


    Over time, Git has become an industry standard for development. Being able to snapshot your code at a specific time is incredibly helpful as your codebase grows and you have to reference previous versions of it.

    How it Works?


    With Git, you record local changes to your code using a command-line tool, called the “Git Shell”. Command-line lets you enter commands to view, change, and manage files and folders in a simple terminal, instead of using a graphical user interface (GUI). If you have not used command-line before, don’t worry, once you get started, it is incredibly straightforward.


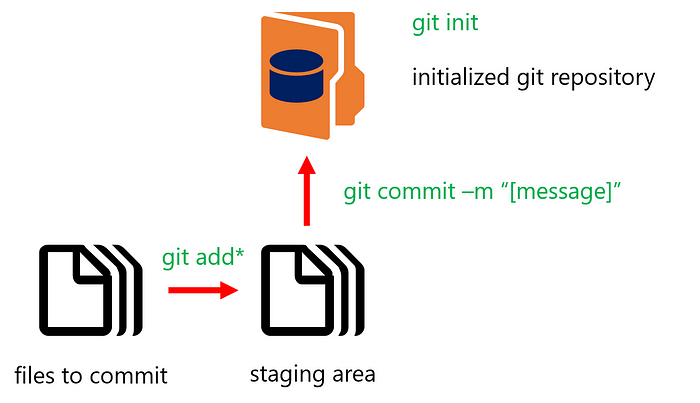
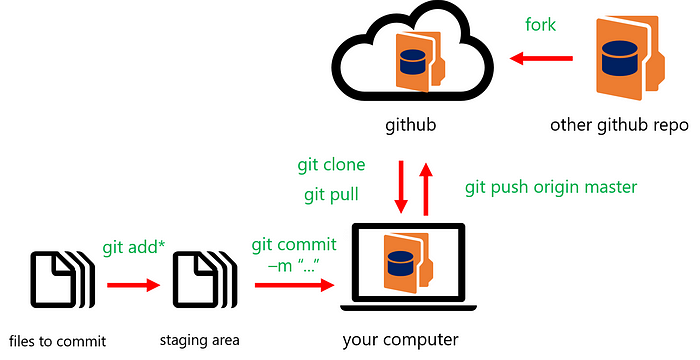
    Essentially, when using Git, you make changes to your code files as you normally would during the development process. When you have completed a coding milestone, or want to snapshot certain changes, you add the files you changed to a staging area and then commit them to the version history of your project (repository) using Git. Below, you’ll learn about the Git commands you use for those steps.

    Terminal Commands


    While using Git on the command line, chances are you will also use some basic terminal commands while going through your project and system files / folders, including:
    • pwd - check where you are in the current file system
    • ls - list files in the current directory (folder)
    • cd - moves to the given directory name or path / change current directory
    • mkdir - makes a new directory with the given name


    Creating Repository


    When you wish to utilize Git for a project, the first command you must do is git init, with the name of your project from your local computer.
    git init [project-name]
    You run this command on the Git Shell command-line in the main directory (folder) of your project, which you can navigate to in the Shell using the commands listed above. Once you run this command, Git creates a hidden .git file inside the main directory of your project. This file tracks the version history of your project and is what turns the project into a Git repository, enabling you to run Git commands on it.


    Making Changes


    git add [file] or git add *
    Once you make changes to your files and choose to snapshot them to your project’s version history, you have to add them to the staging area with git add, by file name, or by including all of the files in your current folder using git add *.
    git commit -m “[message]”

    To finally commit the changes you made to your files from the staging area to your repository’s version history, you need to run git commit with a descriptive message of what changes you made.
    git status

    If at any point, you wish to view a summary of the files you have changed and not yet committed, simply run git status in your project’s repository on the Git Shell command-line.


    Now, with the basic Git commands in place, you can utilize Git to snapshot the version history of your project. Simply initialize a new repository by running git init in your project’s main directory. Using git add *, or git add with specific file names, you add your changes to the staging area. Finally, using git commit, you can add your changes to the repository’s version history.
    As you continue developing code, simply continue to add and commit your changes to your repository.

    What is Github ??


    GitHub is a service that allows you to host your Git repositories online and collaborate with others on them. You can use GitHub through their web portal as well as the GitHub desktop GUI and the Git Shell.

    As a service, GitHub is now used by 12 million developers and organizations, and has become a fairly popular standard for collaborating on projects and open-sourcing code.


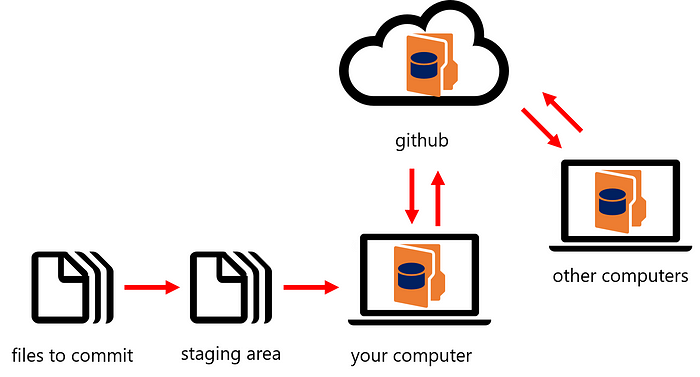
    With GitHub, you have the same local process of adding and committing files to an initialized Git repository on your computer. However, you can utilize GitHub to push your changes to GitHub’s hosting service. This allows other people to similarly work on the same project, pull your changes to their computers, and push their own changes to GitHub. Continue below to see the commands you can use to utilize Git with GitHub.


    Creating & Copying Repositories


    Fork

    With Git on your local computer, if you want to create a new repository, you must run git init. However, many times you may work on projects that are hosted on GitHub and have already been initialized. One of the ways to copy a repository to your GitHub account is using fork, which is available on GitHub’s website.


    Forking a repository essentially copies that project to your online GitHub account. However, to work on that project on your local computer, you must clone the project.

    git clone [url]
    Cloning a project simply copies a Git repository with its version history, by its url, to your local computer from GitHub. From there, you can make and commit changes of your own to that repository. Any changes you commit and then push to GitHub (see below) are saved for your copy of that project.


    Push & Pull Changes


    git push [repo] [branch]
    To publish a new initialized repository or any committed changes from your local repositories to GitHub, you use git push with the repository and branch of your code. The default syntax that you will generally use is git push origin master. This pushes your code to the master branch of your repository.
    git pull
    If any changes happen to a repository that you wish to pull from GitHub to your local computer, such as when collaborating on a project with others, you simply use git pull.

    FYI


    It is important to remember, that while you may have a repository hosted on GitHub, the version history of your local copy can be different than the version history of your repository online.
    Thus, if you try to pull or push changes to files that have already been changed by someone else, and those changes are already on GitHub, you can run into a merge conflict. Essentially, a merge conflict is when the version history of the repository on your local computer is different from the repository’s version history on GitHub. You will need to eventually resolve the merge conflict manually to bring all of the repository’s changes together.

    Branches


    When using Git, you have the ability to view the version history of your project’s development. However, sometimes you may choose to develop features, fix bugs, or experiment in ways where you want to separate your main project’s code from another variant.
    You can do this with branches, which are essentially parallel versions of your repository’s main code— that code is developed on the “master” branch. You can create multiple branches for collaboration and other unique development to your code. Changes you make to files in one branch stay in the version history for that branch only.
    If at any time you want to merge the code from one branch in to another, including the master branch, you make a pull request that merges the changes. However, similar to using git pull and git push, if different changes have been made to the same files on more than one branch, you will run into merge conflicts that must be resolved manually.

    With GitHub, you are enabled to collaboratively use Git to build your own repositories and those of others. You can fork an initialized repository to your own account and clone any repository from GitHub to your computer. As you continue to add and commit changes you make to files on your local computer with Git, you can now additionally push those changes and pull any other commits to and from GitHub.

    Get Started


    To get started with Git and GitHub, sign-up for a GitHub account at github.com.
    Next, download GitHub’s desktop GUI at desktop.github.com. This is an application version of using Git on command-line. This should also download the Git Shell.
    The final step you need to take is to enter your GitHub credentials. You can do this from the Git Shell, or by using the GitHub desktop application. View GitHub’s setup article for more information.
    Git Cheat Sheet - A cheat sheet of Git commands when using GitHub
  • ADDRESS

    490, Zam Zam Road,
    Maruthamunai,
    Sri Lanka.

    EMAIL

    safnaj99@live.com

    MOBILE

    +94 777 97 42 07