Git and GitHub have become popular standards in the software development process. Here’s an introduction to how you can utilize both to write code and Git and GitHub have become popular standards in the software development process. Here’s an introduction to how you can utilize both to write code and build applications.build applications.
What is Git?
Git is a free and open source distributed version control system. What is version control? Essentially, it’s a system that allows you to record changes to files over time, thus, you can view specific versions of those files later on.
Why Use Git?
Over time, Git has become an industry standard for development. Being able to snapshot your code at a specific time is incredibly helpful as your codebase grows and you have to reference previous versions of it.
How it Works?
With Git, you record local changes to your code using a command-line tool, called the “Git Shell”. Command-line lets you enter commands to view, change, and manage files and folders in a simple terminal, instead of using a graphical user interface (GUI). If you have not used command-line before, don’t worry, once you get started, it is incredibly straightforward.
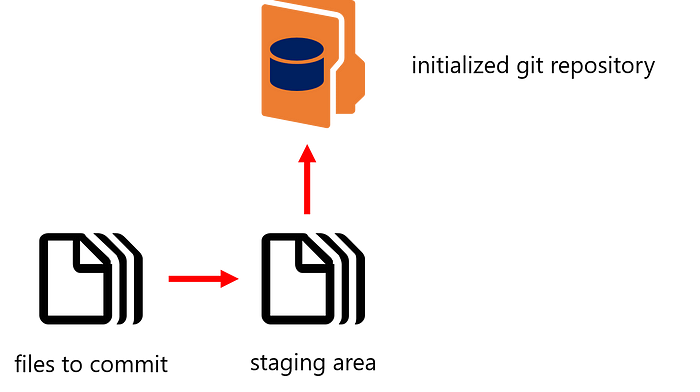
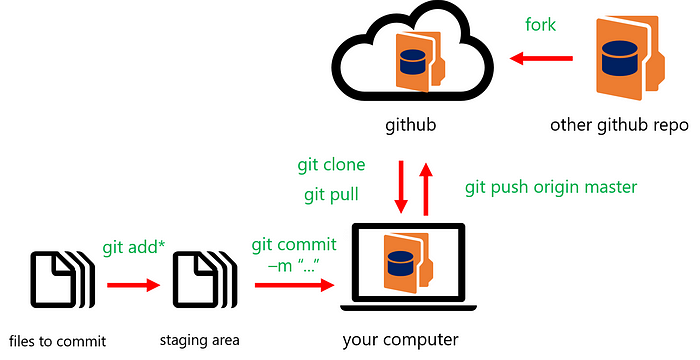
Essentially, when using Git, you make changes to your code files as you normally would during the development process. When you have completed a coding milestone, or want to snapshot certain changes, you add the files you changed to a staging area and then commit them to the version history of your project (repository) using Git. Below, you’ll learn about the Git commands you use for those steps.
Terminal Commands
While using Git on the command line, chances are you will also use some basic terminal commands while going through your project and system files / folders, including:
- pwd - check where you are in the current file system
- ls - list files in the current directory (folder)
- cd - moves to the given directory name or path / change current directory
- mkdir - makes a new directory with the given name
Creating Repository
When you wish to utilize Git for a project, the first command you must do is git init, with the name of your project from your local computer.
git init [project-name]
You run this command on the Git Shell command-line in the main directory (folder) of your project, which you can navigate to in the Shell using the commands listed above. Once you run this command, Git creates a hidden .git file inside the main directory of your project. This file tracks the version history of your project and is what turns the project into a Git repository, enabling you to run Git commands on it.
Making Changes
git add [file] or git add *
Once you make changes to your files and choose to snapshot them to your project’s version history, you have to add them to the staging area with git add, by file name, or by including all of the files in your current folder using git add *.
git commit -m “[message]”
To finally commit the changes you made to your files from the staging area to your repository’s version history, you need to run git commit with a descriptive message of what changes you made.
git status
If at any point, you wish to view a summary of the files you have changed and not yet committed, simply run git status in your project’s repository on the Git Shell command-line.
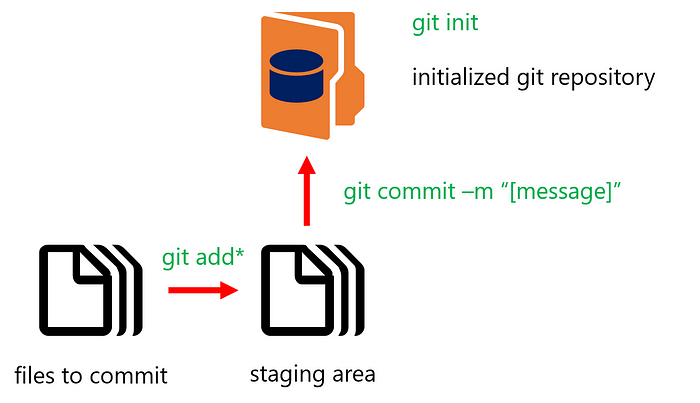
Now, with the basic Git commands in place, you can utilize Git to snapshot the version history of your project. Simply initialize a new repository by running git init in your project’s main directory. Using git add *, or git add with specific file names, you add your changes to the staging area. Finally, using git commit, you can add your changes to the repository’s version history.
As you continue developing code, simply continue to add and commit your changes to your repository.
What is Github ??
GitHub is a service that allows you to host your Git repositories online and collaborate with others on them. You can use GitHub through their web portal as well as the GitHub desktop GUI and the Git Shell.
As a service, GitHub is now used by 12 million developers and organizations, and has become a fairly popular standard for collaborating on projects and open-sourcing code.
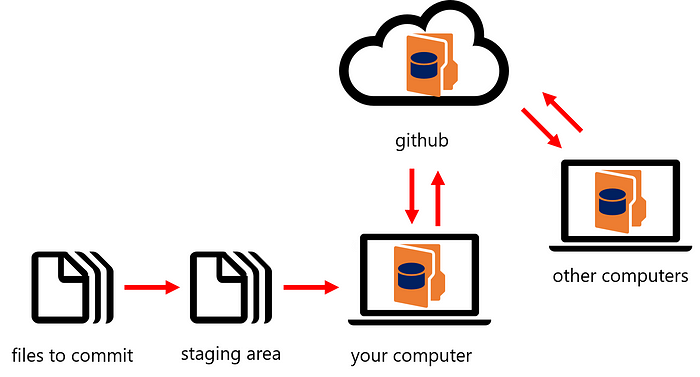
With GitHub, you have the same local process of adding and committing files to an initialized Git repository on your computer. However, you can utilize GitHub to push your changes to GitHub’s hosting service. This allows other people to similarly work on the same project, pull your changes to their computers, and push their own changes to GitHub. Continue below to see the commands you can use to utilize Git with GitHub.
Creating & Copying Repositories
Fork
With Git on your local computer, if you want to create a new repository, you must run git init. However, many times you may work on projects that are hosted on GitHub and have already been initialized. One of the ways to copy a repository to your GitHub account is using fork, which is available on GitHub’s website.
With Git on your local computer, if you want to create a new repository, you must run git init. However, many times you may work on projects that are hosted on GitHub and have already been initialized. One of the ways to copy a repository to your GitHub account is using fork, which is available on GitHub’s website.

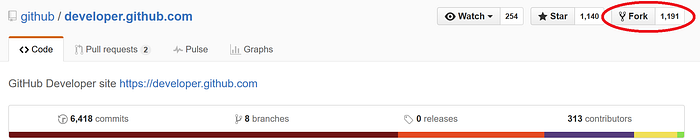
Forking a repository essentially copies that project to your online GitHub account. However, to work on that project on your local computer, you must clone the project.
Cloning a project simply copies a Git repository with its version history, by its url, to your local computer from GitHub. From there, you can make and commit changes of your own to that repository. Any changes you commit and then push to GitHub (see below) are saved for your copy of that project.
Push & Pull Changes
git push [repo] [branch]
To publish a new initialized repository or any committed changes from your local repositories to GitHub, you use git push with the repository and branch of your code. The default syntax that you will generally use is git push origin master. This pushes your code to the master branch of your repository.
git pull
If any changes happen to a repository that you wish to pull from GitHub to your local computer, such as when collaborating on a project with others, you simply use git pull.
FYI
It is important to remember, that while you may have a repository hosted on GitHub, the version history of your local copy can be different than the version history of your repository online.
Thus, if you try to pull or push changes to files that have already been changed by someone else, and those changes are already on GitHub, you can run into a merge conflict. Essentially, a merge conflict is when the version history of the repository on your local computer is different from the repository’s version history on GitHub. You will need to eventually resolve the merge conflict manually to bring all of the repository’s changes together.
Branches
When using Git, you have the ability to view the version history of your project’s development. However, sometimes you may choose to develop features, fix bugs, or experiment in ways where you want to separate your main project’s code from another variant.
You can do this with branches, which are essentially parallel versions of your repository’s main code— that code is developed on the “master” branch. You can create multiple branches for collaboration and other unique development to your code. Changes you make to files in one branch stay in the version history for that branch only.
If at any time you want to merge the code from one branch in to another, including the master branch, you make a pull request that merges the changes. However, similar to using git pull and git push, if different changes have been made to the same files on more than one branch, you will run into merge conflicts that must be resolved manually.
With GitHub, you are enabled to collaboratively use Git to build your own repositories and those of others. You can fork an initialized repository to your own account and clone any repository from GitHub to your computer. As you continue to add and commit changes you make to files on your local computer with Git, you can now additionally push those changes and pull any other commits to and from GitHub.
Get Started
To get started with Git and GitHub, sign-up for a GitHub account at github.com.
Next, download GitHub’s desktop GUI at desktop.github.com. This is an application version of using Git on command-line. This should also download the Git Shell.
The final step you need to take is to enter your GitHub credentials. You can do this from the Git Shell, or by using the GitHub desktop application. View GitHub’s setup article for more information.
Git Cheat Sheet - A cheat sheet of Git commands when using GitHub
source : https://medium.com/@abhishek

0 comments:
Post a Comment
Thank You